Must Haves For An Organized Makeup Vanity!

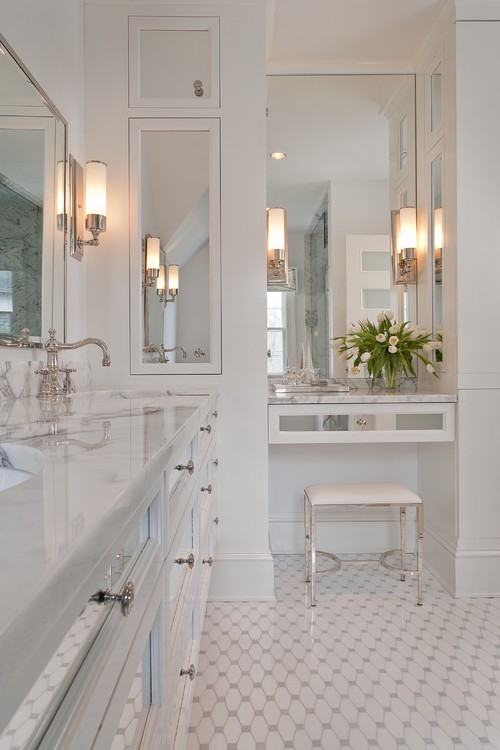
Hmm, so ideally, you would want a mansion of a makeup vanity with all the trims(like the one below on houzz.com)...
I know I do! A huge mirror, a small lighted makeup mirror, ample space for your beauty creams and potions, and smaller containers that are like rooms for each classification of makeup…
We can’t always have it all but you sure can try to make the best of what you have… This list will lay out the most important components of a hard working makeup station!
You can collect these and put them together, or plan your built-in makeup vanity around them.
A vanity van be a huge expense, so use this guide so that you don’t end up with a relatively unusable vanity area…
Position Your Makeup Vanity For Great ( and Free) Lighting
Ideally, find a spot that gets ample natural light. This is for your daytime routine. You’ll then be able to see how your makeup will look when you leave the house. Here are some beautiful vanities that take advantage of natural light...
Navigate using the arrows on the left for the slide show...
So if you’re designing a built in vanity, place it somewhere near a window or door where the user will be facing the natural light source. This could even just be from the side, or in a room that is just flooded with natural light.
When lighting up the vanity, invest in a light that comes from the wall as opposed to ceiling fixtures for a built in. Ceiling lights cast shadows that that make it a bit more difficult to see how your makeup really looks.
The lights work best at eye level for optimal shadow minimization. If covered, the shades should be white and the bulbs should give off white light. This is because white light mimics natural daylight best.
If you can’t afford to break down the wall(like me) to add sconces or wall lights, a lamp will also do. Just make sure that you get the bulb and the shades right, and you’ll have perfect lighting!
Mirror Mirror On The Wall, Give Me The Fairest Version Of Myself!
No mirror= no vanity. So even if you whole vanity is a mirror with all your products on the floor, it’ll count as a vanityJ A full length mirror is great for seeing the big pig picture.
The sufficient alternative will work for most people. A wall mounted/ hung mirror placed in front of your vanity surface.
Then for more precise eye makeup application a small makeup mirror is ideal and will help you zoom and lean in for eyebrow plucking and grooming.
If you have the cash to deck your makeup vanity with a lighted makeup mirror, that gives good lighting because it’s in line with your face in a sitting position.
Somewhere To Store and Organize Your Products
Depending on your style, position what you use every day in the most accessible places... You can keep them in the easy to reach drawers, or on the surface. Place them on a tray that keeps all your everyday products like perfume, moisturizer, foundation, primers,etc..
Then organize the rest of the smaller products in pretty jars, or recycle some glass containers and use them as storage. You could even use shoe boxes that you’ve covered in wallpaper or pretty fabric for storage.
Get some drawer organizers so that you can separate your little makeup pots into different compartments. If your table doesn’t have drawers, you can get a side table or a stacking trolley …
Be creative about storage and think outside of the brush holder!
Make Yourself Comfy
You can be comfy in a basic stool, or fun cushy chair covered in your favorite fabric. Don’t get too comfy though, because then you might want to take longer than necessary to finish your makeup!
Once you've put your makeup vanity together, make sure you stock it with the right tools...
Makeup Know How Home › Makeup Tools › Components of Your Ideal Makeup Vanity
