Deal With Dark Under Eye Circles


Dark under eye circles have women everywhere emptying their wallets into bottomless pits of eye cream promises...
The good news?
Under eye circles are easy to cover up with the right makeup and know-how.
Depending on the severity of your discoloration, I'll show you how to use concealer and color corrector to create brighter looking undereyes.
What Tools Will You Need?
The thing that will make the most difference to your discoloration is corrector. First try and see if it goes away using concealer alone. If it doesn't, then you know that it's time for a color corrector.
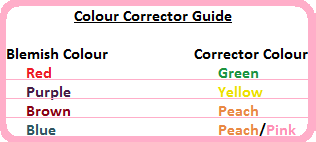
- Concealer Corrector is probably your most important buy . Its job is to neutralize whatever type of blemish you will be working on. When choosing a corrector for dark under eye circles, certain colors are known to counteract different types/ colors of blemishes.
Once you've identified your blemish color, choose the right corrector to counteract it.

You can have all the colors handy for different types of discoloration from a pallete. This way you can deal with correcting other blemishes like scars, pimples, and spots...
 e.l.f. Studio Corrective Concealer |
 15 Color Professional Concealer Camouflage Makeup Palette |
Or you can identify just one problem under eye color and get a dedicated corrector...
Now gather the rest of your tools, and let’s make those circles of despair disappear...
- Regular Concealer in a color one shade lighter than your foundation.This is the concealer that you would use on a regular basis for mild cover-ups, that you will cover with foundation. If you're not going to cover it, use one that matches your foundation color.
- A Concealer Brush or Sponge are both able to get the job done. Brushes are better at applying, while a damp sponge is great for blending.
- Luminizer with light reflecting particles. No glitter!
- Setting Powder in a color that matches your skin to set the makeup
- A Fluffy Powder Brush to use with the powder
Okay, lets move on to technique...
Concealing Dark Under Eye Circles : The Process
Corrector Neutralises The Dark Under Eye Circles
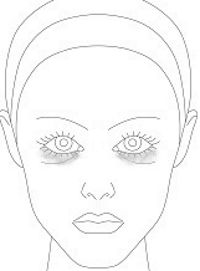
That is, assuming you've just sat to do your makeup with a clean and moisturized face. Using your fingers or brush, gently tap a little bit of corrector onto the dark circle area.
Then, use your brush to blend it and even it out.
Ensure to cover the whole discolored area. The corrector cancels out the dark circles by neutralizing the discoloration.
Apply Regular Matching Concealer

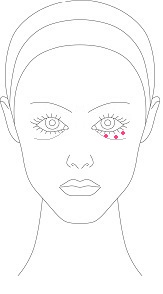
Apply the concealer in a few evenly spaced dots under the eye.
Take your chosen brush and wet it a little. Maybe with a mist of water, or put dip it in and dry it with a cloth. Start blending in gentle dabbing motions. You can use your sponge for this as well.
The wetness makes it a little more sheer, and helps to blend it a little more beautifully. Now because this is NOT a lotion, you don't want to rub it in.
Make sure you also go into the inner corners of your eyes, and just over the outer edges, following the your cheekbone.
The concealer must just sit on top of the skin, so you just dab to blend it onto the skin evenly. Go as close to the lashline as you can. Then make sure to blend the outer rim as well. This is so that you don't see an outline where the concealer begins/ends.
If you'r using a stippling brush, you can blend it in soft, sweeping, circular motions. Remember that when blending, your movement has to be feather light on the skin.
Highlight If You Want To Glow
Luminizer or highlighter contains light reflecting particles so that it makes the area just that much brighter. It's advisable that you purchase one without glitter.
Please.
Glitter is glitter. It just looks strange when people see it - here, you've got something on your face... Oh, it's glitter...
I have an eye cream that did that to me and I didn't even know it had glitter because they don't say so on the box...! The particles are so tiny I didn't even see after I put it on. I only discovered it when the sun was BLINGING, not reflecting- off my face. So remember you want to be bright under the eye, not to have 'bejeweled' dark circles under eyes....
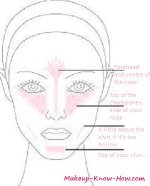
Apply the brightner on the under eye area and on your inner cheeks. Not inside the cheeks! You know what I mean...
After luminizer you are officially done! Don't forget to be very gentle when dealing with eye area.
It's tempting to believe those claiming to be able to permanently make dark under eye circles disappear, but results are often disappointing. With acceptance, and a little bit of makeup, they'll just be a teeny-tiny cog in our beauty machine that's easy to live with, until a real solution comes up....
With the dark under eye circles covered, foundation comes next. If you are going to be applying foundation over the face, try not to move the concealer around. Carefully apply your foundation by blending it into the edge of the concealer.


